)
The NoCoder's SaaS Journey
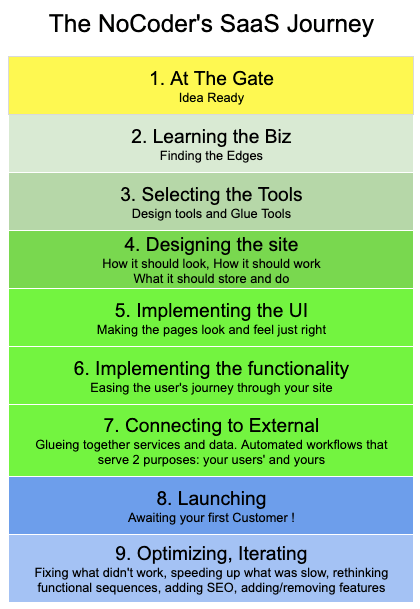
Even if you are starting with nothing but an idea, you can develop a SaaS app. That is possible now due to the NoCode movement and their extremely capable tools. Apps are no longer in the sole purview of developers who write code. Just start from wherever you are. Here's a light treatment of the stages you will go through.
Step 1

You've been using, buying from,and possibly marketing for web and/or mobile apps for a long time. And you've got this idea for your own app that will really shine if you could do it yourself.
But your problem is, and has been for a long time, that you're not a coder. You don't know how to code nor do you want to learn. It seems too much learning, too technical (and maybe a little on the arcane side?) for you to take that learning on right now.
Before the advent of NoCode/LowCode (NC/LC) tools you'd have had to partner with a coder or hire one. But not any more. With NoCode and LowCode tools, you are free to write serious web and mobile apps all by yourself! Freedom!
So what's the first step?
Are there any other businesses on the web (or as mobile apps) like the one you are thinking about creating? How can you find out? You need to know more, so you can decide whether to pursue this.
Well, it's time to start looking and see what inspires you.
So get started! Learning sites like Udemy will show you if there is a market. YouTube can show you who is in this space and Google will find things for you when you only know a bit of what you might want to do.
Step 2
 You've spent several days researching competitors (new and established) and you think you have a handle on what makes each one work: what their strengths and weaknesses are. And you have a pretty good idea of where you could fit into this space.
You've collected what pages are common to each site and those which are unique. You also know what CTAs (Calls to Action) they use to get visitors to engage and ultimately buy from them. You've collected a bunch of bookmarks and made extensive notes in your note-taking app about what you found and how it will shape what you will do.
What is coalescing in your mind now is what your site is going to look like, how it will operate, and how visitors will engage with what you will be offering.
In short, you are ready to start your project. What you need to decide next is what NoCode/LowCode tool(s) you will use.
Step 3

Now that you know what to build, it's time to select one or more tools. But which tools?
There is a huge variety of NoCode and LowCode tools to choose from. Many of them claim to be just what you need - they do it all. Other tools specialize in one aspect of what you need (like databases, mail managers, payment handlers, etc.). There are tools which talk to other tools: monitoring changes in one tool and reacting by sending instructions to other tools.
Well, my friend, this is the truly hard part. You have a pick a tool for putting up the web pages. Something that looks good yet can be customized readily. This is no easy task! And once you pick one, you need to determine how you'll do the rest of your app, should this tool not do some things you had planned for your app.
In the end, it comes down to making a balanced decision from what you've read from the vendor's sites, 3rd-party reviews, etc., and then taking a few tools out for a spin. Deciding is the hardest part - you know when it isn't going to do what you want, but you might be a month figuring that out.
Just make the best decision you can for each tool you need, and get ready to start designing the exact pages of your app!
Step 4

Some people start with pencil and paper. Others use online drawing tools to mock-up their pages and to give life to their designs.
Here you will be consulting your notes from Step 2 (Learning the Biz - i.e. researching your competition). You'll want to be sure you have the same pages that they (in terms of general content, anyway), but you also need to design your versions of those pages to showcase what you are offering and how it is different. In short, you need a style - a visual theme that ties all of your pages together. When a visitor arrives on your app, they should KNOW this app is different - visually. That doesn't mean wildly different (necessarily). But it does mean that they will remember it and as they travel from page to page they will feel they are on the same site because it has the same feel. This idea is intangible, certainly, but as you design your pages, you will see what I mean. If you are in doubt, go back to step 2 and re-examine your competitors' pages with an eye to their "style" or theme.
Next, pay attention to the new pages you'll need. Separately design the public pages, and the private (logged-in pages) if you have them). And give serious thought to having some admin pages where you make it easy to add images and content for the pages of your site, as well as manage users and their transactions/payments/settings.
In the end, you will have a well-designed web and/or mobile app of interconnected pages - entirely unique.
===
Now it's time to transfer those designs into real web pages on a real website of your own!
Step 5
 This step relies heavily on the capabilities of the NoCode tool you chose in step 3 for UI design, so your mileage may vary.
Some tools allow you to specify CSS and HTML directly, whereas most design NC/LC tools offer widgets that are rendered as HTML with CSS styling that can be somewhat customized via the settings they provide for users.
Expect to spend several days if not weeks learning how the tool you've chosen works: what things you can change and what things you can't. Also remember that when putting together your pages, make sure you have versions that look good on mobile devices and if you have the time, on tablets too.
===
Now it's time to connect the pages together, store the data, initiate the procedures (emails, etc), and add animation!
Step 6

Your pages look fantastic!
Now you need to interconnect them, with links between pages where you need them, and a navbar for navigating to the major pages. Don't forget the hamburger menu for when your site is viewed on mobile devices. There are also some important links that are usually found in the footer of most pages.
Your page creation tool will most likely have a way to create all of these navigation aids for your site.
Lastly, if you are going to have registered users on your site (and you have special pages just for registered users, right?) you will need a way to log in/log out/sign up, as well as a database to store users and other site data.
Now your site is full of inter-connected pages and functioning buttons and links. Customer data is being stored.
===
Now it's time to connect to external services - the ones not offered by your chosen NC/LC page design tool.
Step 7
 This is the step where your users interact with services that your site needs. This includes payment processors, email senders, and databases. You may have others that you need to connect with as well.
Here you will be using one or more methods to access these external services. The first method is the simplest: built-in integrations offered by your page design NC/LC tool. If you are really lucky, they will have built-in integrations to all of the services you need for your app.
Next in convenience, is the availability of 3rd-party plugins that your NC/LC tool gives you access to. These can be very easy to use as well. Alternatively, your tool may offer a generic API action that can be customized to handle any service which has a REST interface (the acronyms mean something, but in this light overview, we'll skip them).
The 3rd-party "glue" tools like Zapier, and Make (formerly Integromat) can be connected to here as "services" albeit as indirect services: they connect other services together. You use them like executive assistants to whom you delegate tasks, and can be a real boon to your app (and to you as a business owner) if you need things like notifications when users sign up or when payments are made.
===
Well, the services are now all connected to your app. Emails can fly off to new customers, and data is updated when that happens.
Every external service you need is now working well and every action's results are being stored for later review.
Now it's time to launch!
Step 8

This step is basically when you take the testing/development version of your app LIVE. We call this moving to production.
Essentially, you deploy what you have been working on to a domain name you chose (you bought one already, right?). Then you use your NC/LC tool to deploy your app to this domain and sit back to watch the users streaming in and the money adding up.
That was SUPER easy!
Step 9

OOk. Your app has been live for a while now. You've got a few customers, but not as many as you thought or want. You need that to change, and in a hurry.
You have some ideas of what the problem is, and you address those with tweaks. What you do now is, in essence, repeat all of the steps except the first and maybe the 3rd (tool selection) and make the changes you need to make to your test/development version of your app. Once you're happy with it, you deploy again to your LIVE domain (production). Rinse and repeat.
Your site just gets better and better.